A French drain is one of the best-kept secrets for managing water problems around your home. But like any drainage system, it needs regular maintenance to do its job. If water’s pooling in your yard or your basement stays damp even though recent rains, a clogged French drain might be the culprit. The good news? You don’t always need a professional to fix it. This guide walks you through what a French drain does, how to spot trouble early, and the DIY steps you can take to keep it flowing freely.
Table of Contents
ToggleKey Takeaways
- French drain cleaning prevents water damage to your foundation and yard by removing sediment, leaves, and silt that clog the perforated pipe and reduce water flow.
- Warning signs of a blocked French drain include water pooling near your foundation, soggy patches that persist for days, musty basement odors, and no water flow at the outlet during rain.
- A garden hose at medium pressure can clear light clogs in 20–30 minutes, while stubborn blockages require manual excavation and replacement of compacted gravel around the exposed pipe.
- Professional French drain cleaning costs $300–$800 but is worth the investment if the drain runs under structures, tree roots have invaded the pipe, or the drain exceeds 50 feet in length.
- Prevent future clogs by inspecting the drain outlet twice yearly after heavy rains, keeping gutters clean, maintaining proper slope away from your foundation, and avoiding large trees directly over the drain line.
- Installing geotextile fabric around the pipe during drain installation or replacement significantly reduces sediment entry and extends the system’s lifespan.
What Is a French Drain and Why It Needs Maintenance
A French drain isn’t fancy plumbing, it’s a gravel-lined trench fitted with perforated pipe that redirects groundwater away from your foundation or low spots in the yard. Water seeps through the gravel, enters the pipe through its holes, and flows downhill to a drainage area or storm drain. Over time, sediment, leaves, silt, and soil particles clog the perforations and gravel, choking off water flow.
The deeper problem is that a slow or blocked French drain lets water sit where it shouldn’t. Around your foundation, that means hydrostatic pressure builds up, risking cracks, mold, and wet basements. In landscape swales, standing water attracts mosquitoes and kills plants. Regular cleaning extends the life of your drain and keeps water moving where it belongs.
Signs Your French Drain Needs Cleaning
Watch for these red flags: water pooling near your foundation after rain, soggy patches in the yard that stay wet for days, or a musty smell in the basement. If gutters are overflowing or the ground around downspouts stays perpetually damp, your French drain may not be keeping up. You might also notice the drain exit point (usually a daylight opening or a pop-up emitter valve) isn’t flowing even when it rains hard.
The easiest way to confirm a blockage is to dig down to the drainage pipe at its low point or outlet. Use a screwdriver to poke the gravel, if it’s compacted and muddy rather than loose and draining, you’ve got a clog. Don’t ignore these signs: waiting usually makes the problem worse and more expensive to fix. Studies on home maintenance checklists show that homeowners who tackle drainage issues early avoid costly foundation repairs.
DIY French Drain Cleaning Methods
Using a Garden Hose and Water Pressure
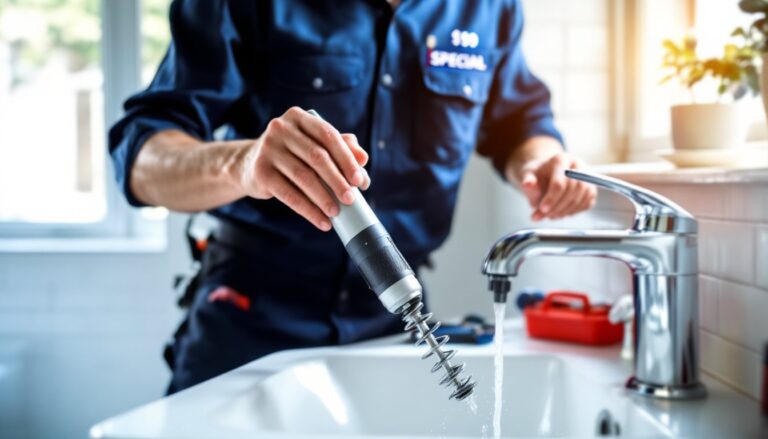
Start here if your drain is only partially clogged. Put on safety glasses and work gloves before you begin. Locate the drainage outlet or pop-up emitter valve and connect a garden hose set to medium pressure. If the drain isn’t easily accessible, you may need to carefully dig to expose the pipe.
Run water through the hose into the drain opening and watch for flow at the outlet. If water backs up or drains very slowly, silt or roots are likely blocking the line. Increase pressure gradually, don’t blast it all at once, which can damage the pipe or dislodge gravel that’s keeping the pipe in place. This method works best as preventive maintenance or for light clogs and typically takes 20–30 minutes.
Manual Removal and Inspection
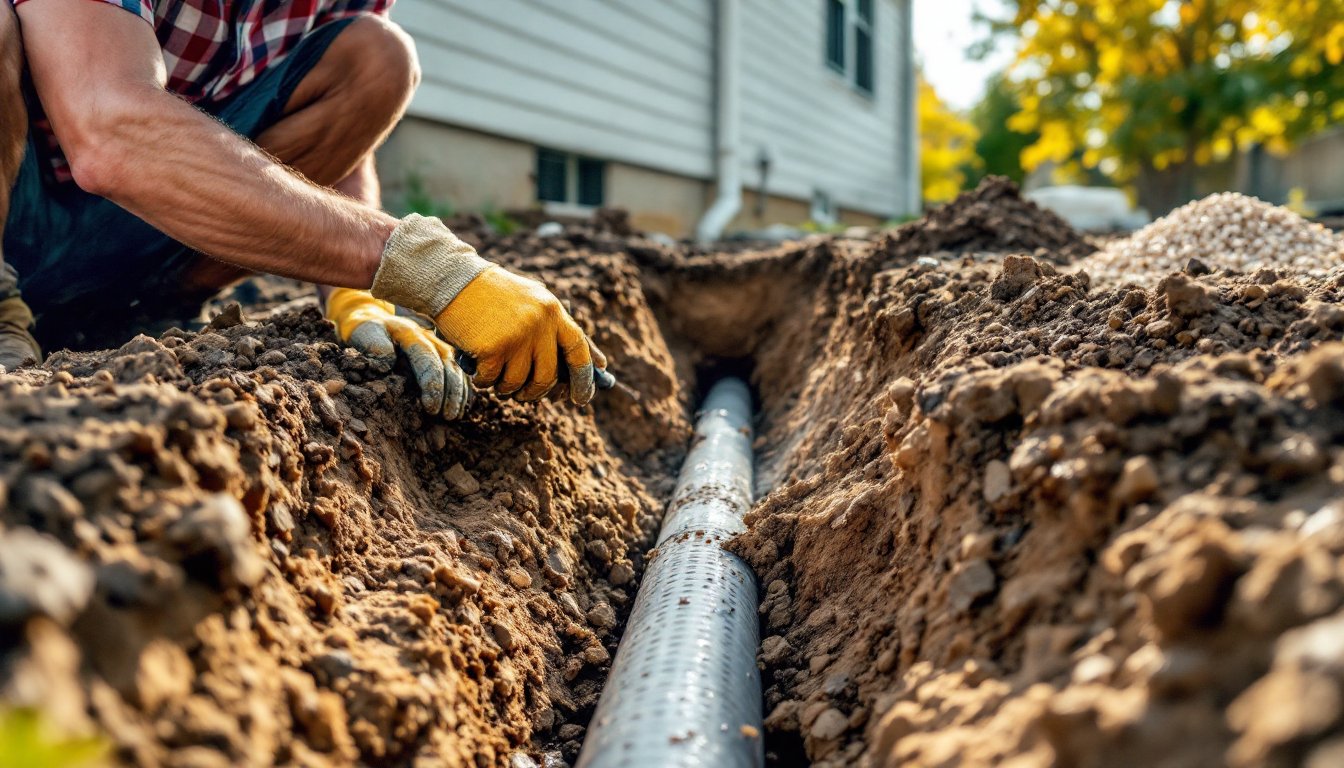
For stubborn blockages, you’ll need to get hands-on. Dig out a section of the drain line, usually 3 to 4 feet is enough to reach the problem. Wear heavy-duty gloves and eye protection because sediment can splash up as you work.
Once exposed, use a spade or flat shovel to carefully excavate around the perforated pipe. Remove any matted debris, roots, or heavily compacted silt from the gravel bed. If the pipe itself is cracked or broken, you’ll spot it now, that’s a sign you need a professional to replace that section.
After clearing, refill with clean gravel or pea gravel (typically 3/4-inch to 1-inch diameter) and regrade the surface to slope slightly away from your foundation. This manual approach takes 1–3 hours depending on the depth and length of the drain you’re working on. Specific guidance on French drain maintenance can help you avoid common mistakes like using fine sand or topsoil, which compact and block drainage even faster than silt.
When to Call a Professional
Some situations demand expertise you won’t have in the driveway. If your French drain runs under your house, a deck, or a shed, excavating it yourself risks damaging the structure. Tree roots invading the perforated pipe, a common issue in mature landscapes, usually require a professional with a drain camera and possibly a root-cutting tool to clear safely.
Also, if the drain is much longer than you can reasonably dig by hand (anything over 50 feet) or if you suspect the pipe is cracked, settled, or installed below code depth, bring in a licensed drainage contractor. They have equipment like hydrojetting trucks, drain cameras, and trenchers that save time and do less collateral damage to your yard.
A professional visit costs $300–$800 for a typical French drain cleaning, depending on the length, accessibility, and severity of the blockage. That’s pricey, but it beats paying $10,000+ to repair a foundation that flooded because you couldn’t access or clear the drain properly. Step-by-step cleaning methods outlined by experienced professionals can guide you on where the DIY line actually is.
Maintenance Tips to Prevent Future Clogs
An ounce of prevention saves a lot of digging. Keep gutters and downspouts clean and direct water away from foundation trenches. If you’ve got a French drain, make sure the outlet isn’t buried or blocked by mulch, soil, or vegetation.
Inspect the drain outlet after heavy rains at least twice a year, spring and fall are ideal. A few minutes of checking saves you hours of excavation later. If your property has many trees, consider installing a sediment filter or root barrier around the drain to reduce silt and root intrusion. Some homeowners also add a cleanout access point (a removable cap or T-fitting) at the low end of the drain, making future cleanings much easier.
If you’re installing a new French drain or replacing an old one, specify geotextile fabric (landscape cloth) around the perforations to filter sediment before it enters the pipe. Don’t skip proper grading, the trench must slope at least 1% toward the outlet, ideally more. Finally, avoid planting large trees directly over the drain line: roots seek moisture and will eventually clog it.